Knowledge Base
Template
Adding a Template Category
Categories are a way to group like templates within crmSeries. As an example, all sales quote templates might be grouped together and categorized as Proposal. Follow the steps below to add a new category.
- When logged into crmSeries, select your name from the upper right, then select System Admin. NOTE: If you do not see the System Admin option, you do not have administrator rights.
- From the system administration menu, select Output Templates, Category.
- From the Category list, select the Add button.

- Enter the Category Name, select a Record Type that the template will be used with. The Record Types are.
- Inventory Request – Documents used with the crmSeries Inventory Request module.
- Meeting – Documents used with the crmSeries Meeting module.
- Parts and Service Quote – Documents used with the crmSeries Parts and Service Quote module.
- Sales Quote – Documents used with the crmSeries Sales Quote Module.
- Sales Quote Equipment – Documents used with the crmSeries Quote module and will be related to the specific equipment on a sales quote.
- UC Measurement – Documents used with the crmSeries Undercarriage Wear Measurement module.
- Quote Internal Result – If the document should only be available if a machine on a sales quote was set to Won. This is primarily used when setting up a sales agreement when a deal is won.
Editing a Template Category
- To edit a Template category, select the edit icon (pencil) to the right of the row to edit.
- Make the necessary modifications and select the Save icon (Diskette). NOTE: Select the Cancel icon (X) to cancel the update and close the row.
Deleting a Template Category
- To delete a Template category, select the Delete icon (Trash Can) to the tight of the row to delete.
- At the prompt, select Yes to delete or No to cancel the delete. NOTE: Deleting a category that is in use with existing templates may cause issue with the templates.
Adding a New Template
crmSeries allows two types of templates, Microsoft Word and Acrobat pdf, that can be uploaded for merging crmSeries data. Below are the steps for uploading the templates.
- When logged into crmSeries, select your name from the upper right, then select System Admin. NOTE: If you do not see the System Admin option, you do not have administrator rights.
- From the system administration menu, select Output Templates, Output Templates.
- From the Template list, Select the Add button.

- Enter the template information into the template form.

- Category – Select the category type for the template. NOTE: For adding template categories, see the Adding Template Category.
- Template – Template Name
- Add File – Drag and drop the template to add or select the Browse button to navigate to the template to upload.
- Template Type – Select PDF or Word
- Description – Description of the template.
- Select the Save button.
Editing a Template
- When logged into crmSeries, select your name from the upper right, then select System Admin. NOTE: If you do not see the System Admin option, you do not have administrator rights.
- From the system administration menu, select Output Templates, Output Templates.
- The Template list will appear and included the following columns.

- Category – Category associated with the template.
- Template – The name of the template. Selecting the template name link will download the template.
- Template Type – The Template Type is either a pdf or a Word document.
- Scope – Defined the focus of the data that will be merged into the template.
- Description – Description of the template.
- Fields – Only used for a Template Type of pdf. Provides a link to the field mapping between the pdf document and the crmSeries fields. NOTE: For additional information about how to map pdf fields see the section, “Mapping pdf Fields.”
- Signable – Only used for a Template Type of pdf. Indicates if the template is signable.
- Convert to PDF – Only used for Template Type of Word. If selected, a Word template will be converted to a pdf document type when the document is selected.
- Manage – Icons used to edit or delete the template row.
Mapping pdf Fields
- When logged into crmSeries, select your name from the upper right, then select System Admin. NOTE: If you do not see the System Admin option, you do not have administrator rights.
- From the system administration menu, select Output Templates, Output Templates.
- From the Template List, select the number link under the Fields column. NOTE: When adding a new template follow the steps under the section “Adding a New Template”.
- From the Mapping Field List, double click on the row to edit. This will open the Field Mapping form.

- From the Field Mapping form, enter the values.
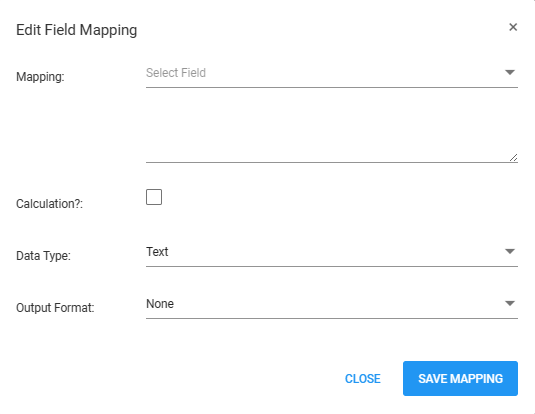
- Mapping – List of crmSeries fields that will map to the pdf template field.
- Calculation – Select if the mapping fields will be calculated. As an example, if the mapping fields selected are sale price + sales tax, then calculation should be selected.
- Data Type – Data Type, either Text or Numeric.
- Output Format – Determines how to format the data on the pdf. The format is either, None, Currency, or Percent.